One of the advantages a business can have over another is having more than one easy payment option which is what Venmo makes available for its business accounts. Venmo is more than just a peer-to-peer mobile payment platform.
As a business owner, setting up a Venmo account for your business enables you to accept both contactless and in-person payments. Your customers can easily scan your printed QR code or phone. Venmo also allows you to tap into its over 90 million customer base while also ensuring swift and secured transactions.
If you’re ready to start accepting Venmo payments, this article will walk you through the simple steps to set up your Venmo Business account. You will also find helpful information like how to create a Venmo personal account and Venmo for business fees. First, let’s see what exactly a Venmo Business account is.
What is a Venmo Business Account?
A Venmo business account is a type of Venmo account designed for small businesses and entrepreneurs to accept payments directly through the Venmo app. This allows businesses to receive payment from their customers who use Venmo without any third-party interference.
With this account, you can send invoices to Venmo users, track transactions, and even connect to e-commerce platforms. Venmo added this feature in 2020 in a bid to expand the payment service and accommodate more users. It makes it easy for businesses to manage payments and connect with Venmo’s large user base.
Setting up a Venmo Business Account – Things to Know
The following are the things you need to know and put in place before you start setting up a Venmo business account.
- You will need a personal Venmo account to set up a Venmo business account.
- Venmo issues plastic-type debit cards if you would like to have one
- Venmo is designed for mobile use, therefore, you should upgrade your phone’s OS (operating system) before downloading the app for optimal use.
- Transacting on Venmo’s website limits your options.
- The information you will need to set up a Venmo business account are:
- Business name
- Business description and address
- Profile image
- A handle for the business(@businessname)
- A US Phone number
6. There are three verification levels:
- Identity verification
- Phone verification
- Bank account verification
How to Create a Venmo Personal Account
Step 1: Go to the App Store if you have an iPhone or Google Play Store if you’re using Android. Download the Venmo app and install it.
Step 2: Open the Venmo app, click on “Sign Up”, fill in your personal details like your name, phone number (a US number), and email, and then set your password.
Step 3: A verification code will be sent to your mobile number via text. Enter the code into the space provided to verify your phone number.
Once that’s done, you have successfully created a Venmo account.
How to Set Up Venmo Account for Business
Creating a Venmo business profile is quite straightforward. The steps for setting up Venmo for business include:
- Create your business profile
- Verify Your Identity
- Allow tipping
- Order a QR kit
- Add a card or bank account
Now, let’s take a look at each step of the process in detail.
Step 1: Create Your Business Profile
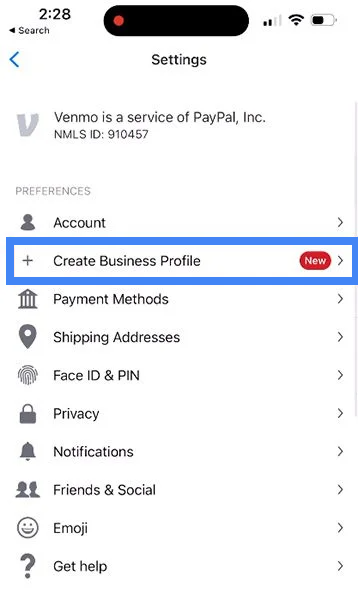
After setting up your personal Venmo account, you can create a business profile. Tap on the menu (three lines in the upper corner) and select “Create Business Profile”. Venmo will ask for your business details such as the name of your business, the type of business, business description, address, and profile image. Fill in this information carefully, as it will appear on your profile when customers pay you.
Step 2: Verify Your Identity
Additionally, you will need to verify your identity by providing details like your legal name, date of birth, address, social security number, or individual tax identification number. You can also add your business website and contact details to your business profile.
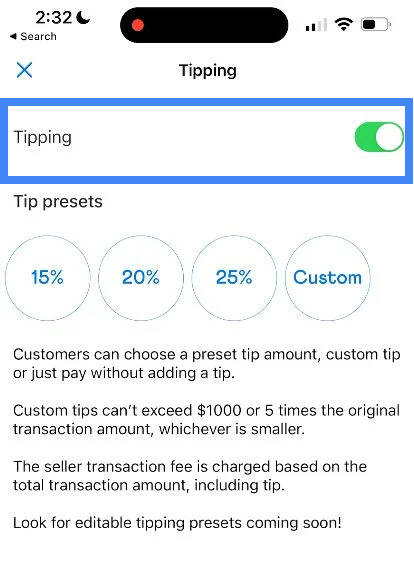
Step 3: Allow Tipping (Optional)

Venmo gives you the option to turn on tipping. This feature allows your customers to add a tip to their payment, which is useful for service-based businesses. To enable it, go to your business profile settings and toggle the “Tipping” option. You can even set a suggested tip percentage (15, 20, or 25 %) to make it easier for customers.
However, note that turning on tipping doesn’t mean your customers have to tip you. It is their choice.
Step 4: Order a QR Kit (Optional)
To make in-person payments easier, Venmo provides a QR Kit. This is a physical QR code that customers can scan to pay you. Go to the “Business Tools” section in the app and order your free QR Kit. This is especially helpful for physical stores or events, where customers can quickly scan and pay without hassle.
Note that only the first QR kit is free as the kits cost $14.99 subsequently.
Step 5: Add a Card or Bank Account
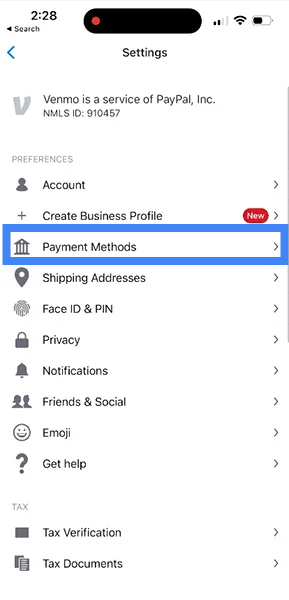
Lastly, you’ll need to link a bank account or card to your Venmo account to send money to other Venmo users or withdraw money. Tap “Payment Methods” in the settings, and choose to add a bank account or debit card. Venmo will guide you through the steps of entering and verifying your banking details. Once linked, you can transfer money from your Venmo account to your bank whenever you need to.
What Are The Venmo for Business Fees?
The table below gives an overview of the major Venmo for Business fees:
| Transaction Types |
Fees |
| Transactions between Venmo Accounts |
1.9% + $0.10 |
| Credit card payments |
3% |
| Pay with Venmo |
3.49% + $0.49 |
| Instant transfers |
1.75% |
| International payments |
1.5% |
How To Receive Payments Using a Venmo Business Account
Once your Venmo business account is set up, receiving payments is easy. The funds go directly into your Venmo balance, which you can later transfer to your bank or card. Here are the ways you can accept payments:
1. Through Your Business Profile
Customers can pay you by searching for your business profile on the Venmo app. Once they find your profile, they simply tap “Pay,” enter the amount and confirm the transaction. It’s a simple and quick way to receive payments from Venmo users.
2. Using Your Business Website
If you have an online store, you can add Venmo as a payment option. To do this, enable PayPal Checkout on your website. Once integrated, the Venmo button will appear on your checkout page, allowing customers to pay via Venmo. If they use a mobile device, the Venmo app will open for them to complete the payment. If they’re on a desktop, they’ll scan a QR code with their Venmo app.
3. Scanning a QR Code In-Person
For in-person payments, you can display a QR code in your store. Customers can scan the code using their Venmo app to send payments directly to their account. If you don’t have the QR code displayed, you can show the code from your phone for them to scan. This is great for quick, contactless payments.
Benefits of Venmo Business Profile
Setting up Venmo for business comes with several advantages for businesses, both large and small. Here are some key benefits:
- More payment options: With a Venmo business account, you can give your customers an additional way to pay. Many people already use Venmo, so offering this option makes it easier and more convenient for them to complete their purchases.
- Instant access to funds: Venmo’s instant transfer feature lets you quickly access money from your business account. This is helpful for small businesses that need cash on hand to manage daily operations or buy inventory.
- Increased exposure through social sharing: Venmo has a social element that allows users to share their payments with friends. When customers pay you, their friends might see it, giving your business more visibility and potential new customers.
- Lower transaction fees: Venmo offers lower transaction fees compared to many other payment processors. With a fee of 1.9% + 10 cents per transaction, it’s a more affordable way to process payments than traditional methods.
Frequently Asked Questions about Venmo Account for Business
- How do I set up a Venmo business account?
To set up a Venmo business account, follow the steps explained earlier in the article. Start by downloading the Venmo app and creating an account. Next, select the option to create a business profile and follow the prompts to enter your business details, including tax information. Finally, link a bank account or card to receive payments.
- Is a Venmo business account free?
Setting up a Venmo business account is free, however, Venmo charges a processing fee of 1.9% + 10 cents for every transaction made to your business profile.
- What is the difference between Venmo and Venmo business?
The main difference between Venmo and Venmo Business is their purpose. A personal Venmo account is for peer-to-peer payments between individuals, while a Venmo business account allows merchants to accept payments from customers.
- Does Venmo Work Internationally?
No, Venmo doesn’t work internationally. Venmo is a US-based platform which means it is only restricted to people in the United States. This also means that Venmo does not work in Nigeria, but to own a virtual bank account that offers a free dollar card, visit Nosh.
To bypass this, some people try to use the VPN. If you get a VPN that can change your IP address to the US, you will have access to Venmo. However, you will still need a US number to register on Venmo.
- How do I know if my Venmo is a business account?
A simple way to confirm if your Venmo account is a business account, is by checking your profile. Navigate to your menu and click the drop-down menu under your profile. If there’s an option to “Create a Business Account.” then your profile is personal and not business. You can do this on both app and website.
Conclusion
Setting up a Venmo business account is a simple way to start accepting payments from Venmo users. By following the easy steps in this guide, you can quickly get your business ready to receive payments. Venmo allows you to accept payments through your business profile, website, or in person via QR codes.
Additionally, Venmo’s lower fees, instant transfers, and social sharing features make it a great option for small businesses looking to grow. With Venmo, you can offer your customers a fast and convenient way to pay.